The Science of Photography - Halftone Reproduction |
|||||||||||||||||||||||||||||||||||||||||||||||||||||||||||||||||||||||||||||||||||||||||||||||||||||||||||||||||||||||||||||||||||||||||||||||||||||||
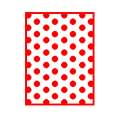
The most common mechanical printing processes can only print ink or leave blank areas on the page, they cannot print different shades of a colour. A newspaper press, for example, can only print black or nothing. However photographs are continuous tone, that is they contain various shades of grey between the extremes of black and white. In order to overcome this printing limitation the halftone process was invented. The traditional halftone process converts different tones into dots of varying size. The eye has limited resolving power and, at a distance, is tricked into seeing these dots as continuous tone. Move the cursor over the links below to demonstrate the conversion of
a continuous tone image into a greatly exaggerated halftone.
The term "halftone" is confusing because halftone images dont, in fact, have any tone. They only appear to have tone when viewed from a distance. Tone density, as demonstrated below is only simulated by the amount of black to white in a particular area. Move the cursor over the different density settings below to see the traditional halftone patterns.
As you can see from the above diagram the standard halftone screen gives a round dot, which becomes a square in midtones. For more information about the invention of halftones refer to PhotoHistory
- Photographs in Print.
Traditionally a halftone is created by placing a glass screen, with a finely ruled grid of lines, close to the emulsion surface in a process camera. As the screen is just out of contact with the emulsion very tiny areas of light are formed under each square of the screens grid. Full brightness is at the centre, this gradually tapers off to virtually nothing behind each grid line. Very high contrast emulsion is used which does not record the gradual changes in tone behind each square of the grid but records a sudden transition from black to clear film at a particular contrast setting. The size of the dot behind each grid square is proportional to the intensity of the light falling on it. Therefore the tones of the original photograph are converted to dots of varying size on the high contrast film. Move your cursor over the links below to see a tone gradient being exposed
through a traditional halftone screen onto a high contrast film. You can
also see the effects of varying the threshold level on dot size.
Originally a halftone screen was used to convert continuous tone into
a pattern of dots. Nowadays digital halftone screening methods are available,
enabling the dots to vary in size, pattern and frequency.
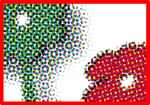
Halftone screens are measured in lines per inch. The higher the number of lines the better the quality of reproduction. However higher quality paper is needed for the finer screens. The angle of the halftone screen is usually set at 45 degrees to the horizontal as this appears to be the easiest on the eye. When two screens are superimposed and are not quite aligned, or when the halftone screening process is applied to images with patterns or previously screened photographs there is the possibility of creating moiré patterns due to the interference of one screen on another. Move your cursor over the links below to see moiré patterns being
created as two screens move across each other.
The dots in traditional screening are arranged in regular column and
rows, but vary in size. With digital processing it is now possible to scatter
the dots randomly, tone being created by size and frequency. This "frequency
modulated" screening process reduces the possibility of the moiré
pattern.
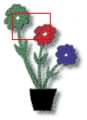
In theory any colour can be created from a combination of yellow, Magenta, and Cyan. Refer to the Colour Reproduction section for more information. However there are practical limitations with the process. The main problem is that the black created from these three process colours is not very pure. So a fourth colour, black, is added to deepen the dark areas and increase contrast. This four colour process is called CMYK, where the K represents black. The range of colours that can be reproduced is still limited even with the four colour process. Therefore for very high quality art printing other process are used, for example Pantones Hexachrome six colour system which uses a brighter version of CMYK plus orange and green. In order to print the different colour components in a four colour process it is necessary to separate the colour layers. Originally this was done in a process camera with different coloured filters, but is now most commonly performed digitally. Each colour layer is converted into halftones, but each halftone screen is at a different angle to reduce the moiré effect, although the screen positions still produce a rosette pattern that can be seen under a magnifying glass. Move your cursor over the links below to see different combinations
of colour separated halftones that have been greatly exaggerated to demonstrate
the process.
Usually the screens for black, magenta and cyan are orientated at 30 degrees to each other at 45, 75 and 105 degrees respectively. Yellow, the least strong colour, is at 90 degrees as this angle is the most obvious to the eye. When all four halftone colour screens are joined together the eye visually mixes the coloured dots to reproduce the original continuous tone colours. Next in the Science of Photography : Mechanical Printing Forming
the Image | Controlling
the Image | Colour
Reproduction
|
|||||||||||||||||||||||||||||||||||||||||||||||||||||||||||||||||||||||||||||||||||||||||||||||||||||||||||||||||||||||||||||||||||||||||||||||||||||||
| Ted's Photographics |
|
;)
;)

;)
;)
;)
;)
;)
;)
;)
;)