The Science of Photography - Controlling the Image
|
Chemical Image Processing | Digital Image Processing Subject Lighting | Halftone Reproduction | Mechanical Printing |
| Aperture |
The amount of light entering a lens is controlled by the aperture, this is a circular hole, usually of adjustable size, positioned within the compound lens barrel.
Normally an iris diaphragm is used to vary the aperture setting, the settings are called f stops. The smaller the f stop the larger the aperture, a common range is between f 1.8 (widest) and f 16 (smallest).
Move the mouse over the f settings below and see the aperture change.
 |
||||||||||||||||||||||||||
|
The f number scale was originally devised because the image brightness not only depends upon the size of the aperture but also the focal length of the lens.
The lens and aperture are both taken
into consideration by the lens manufacturer to determine the f stop settings
of the lens. The f stop settings are universal, for example f 8 on different
lenses will produce images of the same brightness.
| Shutter | Back to the top |
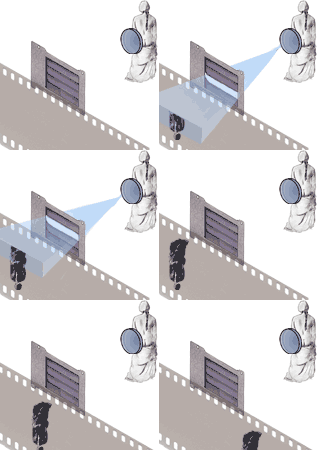
The shutter controls the length of time the film is exposed to light. Photographic exposure is determined by the image brightness and exposure time. Increased exposure time can compensate for a dim image.
Most single lens reflex cameras
use a focal plane shutter to control the amount of light falling
on the film. The shutter consists of metal blinds that form a slit which,
when passing across the face of the film, creates the exposure.
 |
With focal plane shutters the exposure duration is controlled by the width of the slit and the speed of the blinds. Focal plane shutters offer a wide speed range and also enable the 'reflex' camera mechanism to be fitted behind the lens. Please refer to Camera Basics for additional information. |
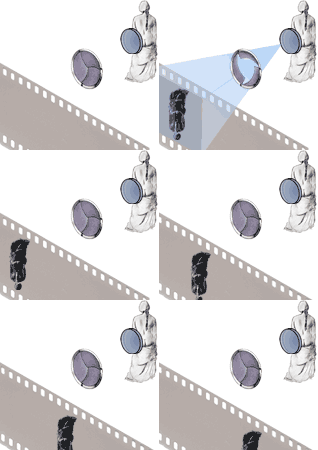
Electronic flash imposes problems because of its short duration, if fired when the slit is travelling the flash will only expose the small potion of the negative revealed by the slit.
Focal plane shutters may
create image distortion if the subject is rapidly moving across the field
of view or the camera is being moved to track the subject. In the time
it takes for the slit to move across the film plane the subject has moved.
The first part of the negative records the subject in one position and
as the subject and slit moves the negative progressively records the subject
in different positions.
Exposure time, often measured in fractions
of a second, may also determine the sharpness of the picture. A long exposure
will record movement as blurs and it is possible for high speed photography
to freeze a speeding bullet.
| Depth of Field |
For any photographic image there is only one point of true focus, in front of and behind this point there is a zone where the image is acceptably sharp. This zone of sharp focusing is called the "Depth of Field".
The Depth of Field varies depending upon the aperture and focal length of the lens. The smaller the aperture the greater the depth of field. The shorter the focal length of the lens the greater the depth of field.
Use of the aperture to control the depth of field is illustrated below. The lens is sharply focused on the centre object, move the mouse over the aperture settings to see how the depth of field changes. The illustration shows the aperture setting, the camera and subjects as well as the final image.
 |
||||||||||
|
More of the image comes into sharp focus as the depth of field increases and with skillful manipulation the photographer can emphasize certain details of the picture while playing others down.
The depth of field effect shown above can also be created by changing the focal length of the lens, while keeping the aperture constant. The illustration below shows the lens, camera position, subjects and final image. Move the cursor over the focal length settings to see the changes to the depth of field.
 |
||||||||||
|
Depth of field is not only influenced by aperture and focal length but also by the camera to subject distance. The basic rule being : the closer the subject the smaller the depth of field. The illustration above shows both the camera to subject distance decreasing and the focal length decreasing, this enables the object to always appear the same size in the final image. These two actions have the opposite effect on the depth of field. Reducing the focal length of the lens increases the depth of field while decreasing camera to object distance reduces the depth of field. However the use of the shorter lens, even close to the subject, still gives extended depth of field.
You should also be aware that changing
the focal length of the lens and the camera position introduces changes
in perspective as well as depth of field, please refer to the next section
for more information.
| Perspective, Shape, Size and Distortion |
As we discussed in a previous section the shorter the focal length of a lens the wider the angle of view. The longer the focal length of the lens the narrower the view, producing, in effect, an enlargement of detail.
Relative perspective, that is the position of one object compared to another, changes when the position of the camera changes. However the most dramatic perspective changes occur when both the camera position and the focal length changes. Sizes and distances can appear distorted.
You can change the relative image size by either moving in closer to the subject or changing the focal length of the lens. However although you may obtain the same image size with either method the perspective will change. This is illustrated in the following sequence of diagrams showing camera distance , focal length, subject, background and the final image.
Move the cursor over the different focal length and distance combinations to see how the subject size and the perspective of the background change in the final image. In the first column of links the focal length of the lens is the same but the distance from the subject changes, in the second column the distance is the same but the focal length changes.
|
 |
Through a short lens distant objects seem very distant and small, through a long lens distant objects appear to be closer and larger. If the camera position is moved back and a long lens is used all the objects are magnified and squeezed together. If the camera position is moved closer and a wide angle lens is used to cover the same view then distances between the objects will be stretched out.
The camera not only can be moved backwards and forwards in relationship to the subject but it can also be tilted up and down and swivelled from side to side.
Without any correction these camera movements may also create distortion in the final image. Tilting the camera up to record a tall building will produce the effect called "converging verticals". The base of the building, being nearer the camera, will appear larger than the top of the building. This distortion can be corrected by moving the image plane so it is parallel with the building. Special cameras and lens attachments allow you to independently control the lens position and image plane.
The camera position and angle, in conjunction
with the focal length of the lens being used, determines perspective and
image size. Any resulting distortion maybe regarded as a nuisance by the
photographer but in skilled hands can often be put to good use.
|
Forming
the Image | Controlling
the Image | Colour
Reproduction
|

